This tutorial will give you an understanding of how the Threshold Achievement system is used to administer tests. You will find
more detailed descriptions in the online help that is available throughout the system. Let's start by defining some of terms used by
the system.
All of the core functionality of the Threshold Achievement system is provided by the Manager Dashboard which allows
you to set up, administer, pay for, and download reports for your Threshold Achievement tests. Once you sign in from the Threshold Achievement
web site, you will be presented with your Manager Dashboard. Below is an example of what you might see:
Let's discuss the layout of the Manager Dashboard. At the top is the Header, displayed in black. Inside the header is the Threshold
Achievement logo,  , and the Manager Dashboard title. Clicking on either of these will return
you to the Manager Dashboard from anywhere in the system. To the right of the title is the Help icon, .
Every page in the system has a help icon. Click this icon to display a popup window with help information about the page you are on.
You can see the progression of actions going left to right.
Once you have added a test, you can elect to authorize read-only access to others, ,
edit the setup, , or preview the test, .
If you decide not to use the test, you can delete it, .
All of this is done from the Manager Dashboard.
The remaining sections of the tutorial below can be expanded by clicking the section title. You can collapse an expanded section by clicking the section title again.
You can edit your personal settings by clicking the Settings icon, , or your name in the
header. You can update your name and title and change your password. You can also control how Student Keys are presented in PDF documents.
You will read more about creating Student Keys below.

To create your first test, click the Add icon, , to the right of the Tests section heading.
The test edit form will be displayed as shown here:
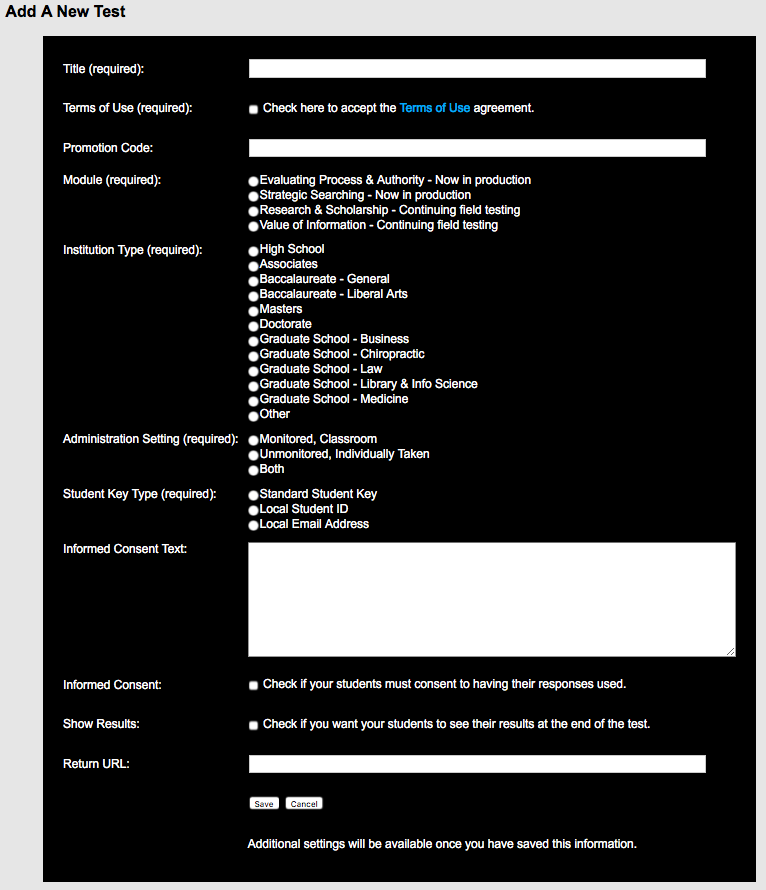
Fields that are required to be completed are marked as such.
You must enter a title for your test. Most test titles contain the time period they cover in order to make it easier to find the
correct test at a later date.
You must also agree to the Terms of Use before you can create a test.
From time to time, there will be promotional discounts available. If you have a Promotion Code, you can enter it here.
There are four different modules available for the Threshold Achievement Test for Information Literacy. You must select which module you want to
administer. Only one module can be administered in a test.
Select your institution type. Institution types are used for generating cross-institutional analyses in reports.
Select how you will administer the test. We will use this information for determining if there is any difference in the performance of students
when the test is administered in a classroom, unsupervised, or both.
You can select amoung three different types of Student Keys. You can use the system-created Standard Student Keys, which are randomly generated
six-digit numbers. If you have a list of local institutional identifiers, that is, either Student IDs or email addresses, of the students who will be taking
the test, you can use one of these instead. You will need to upload the list of local identifiers to the system before your students can take the test.
The prompt your students see when logging in will match the type of Student Key you select.
If your institution requires that you inform your students about how you will be using the results of the test or if you have specific information
that you would like your students to see before they begin the test, you can enter this information in the Informed Consent Text field. This is
entirely optional.
Also, your institution may require that students be able to opt-out of having their responses used. You can allow your students to do this by checking
the Informed Consent checkbox. When enabled, immediately after your informed consent text, your students will be presented with the question:
May we use your responses for our research project?
to which they must select either Yes or No before they can proceed. Student who opt-out will still be able to complete the test, but their
responses will not be included in your report and you will not be charged for them.
You can choose to have a report of your students' results presented to them at the end of the test. They will have
the option to download this report as a PDF document. If you do not select this option, your students will be taken directly to the thank you page. The results
documents are still created and will be included in your report download for your use. If you have provided a Return URL (see below), your students must
click the Exit button at the bottom of the report to be taken to that web page.
When your students have completed the test, they will see a thank you page. You have the option to have your students sent to a web page on your web
server once they have completed the test. This is called a Return URL. Enter the complete URL of the web page where your
students should be sent in the field provided. The Test Key and Student Key of the student completing the test will be appended to the URL you provide.
This can be used for tracking or extended surveying on your web site if you have web programming skills.
There may be other people at your institution whom you would like to give access to your test settings. Once these people have registered on the
Threshold Achievement web site, you can authorize them to have read-only access to a test. Read-only access will allow viewing (but not
editing) of your test setup, previewing the test, the generation of Student Keys, downloading the Student Keys of those students who have completed the test,
making payment for the test, downloading (but not preparing) the report for the test, and copying the test setup to a new test.
Click the Member icon, , to select which people will have this access.
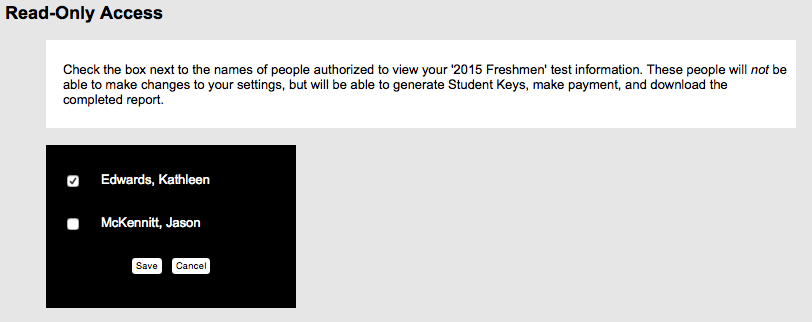
You can revoke read-only access at any time by unchecking the checkbox in front of the person's name.
From the Manager Dashboard, click the Setup icon, , to view the information that
you entered for the test.
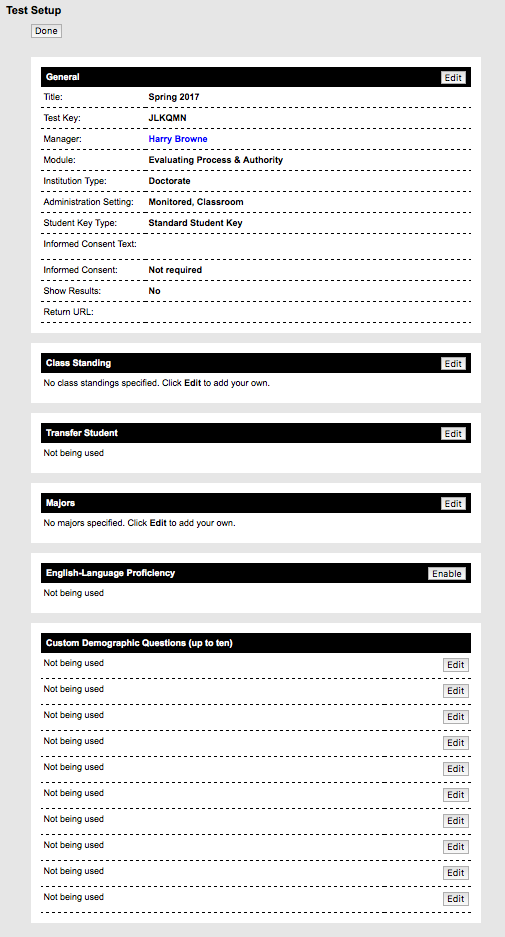
Until you start testing, you can make changes to your test setup. There are six sections of your
test setup that you can edit: General, Class Standing, Transfer Students, Majors, English-Language Proficiency, and Custom Demographics.
Each of these sections will have an Edit (or Enable/Disable) button on the
right-hand side when you are able to make changes. The Custom Demographic section has an Edit button for each of the ten optional custom demographic
questions you can configure. The General section has the information that you entered when you added the test.
Class Standing
If you want to receive scores for your students by class standing, you will need to enter the class standing labels in use at your institution.
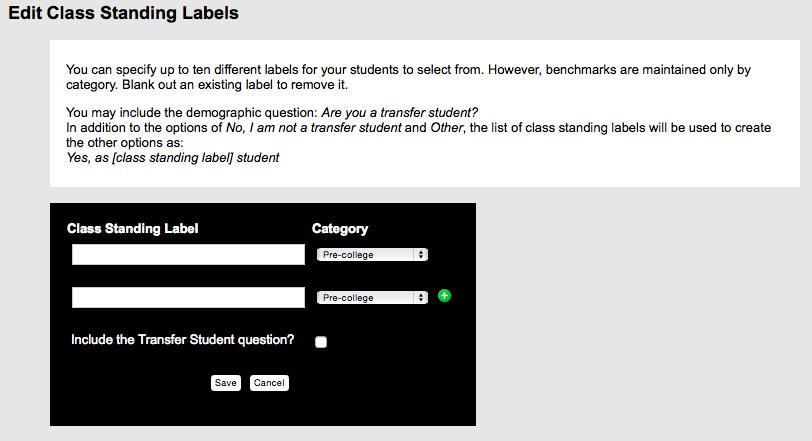
You can specify up to ten different labels per test. Click the Add icon, , for additional
label fields. Each label must be assigned to a class standing category. The categories for class standing are:
- Pre-college
- Freshman
- Sophomore
- Junior
- Senior
- Post-baccalaureate
- Other
You can assign more than one label to the same category (for example, First Semester Freshman and Second Semester Freshman
would both be assigned to the Freshman category),
however, cross-institutional data are collected by category. Your report will show your scores for each class standing label but the cross-institutional scores will only be reported by
category.
Transfer Students
If you are including class standing labels, you can also choose to ask your students if they are transfer students. You can only ask this if you are including
class standing labels since the options your students will see are based on those labels. For example, if you use years for your class standing labels,
a student might see the following options:
- No, I am not a transfer student
- Yes, as 1st year student
- Yes, as 2nd year student
- Yes, as 3rd year student
- Yes, as 4th year student
- Other
Check the provided checkbox to have your students answer this questions.
Majors
If you want to receive scores for your students by major, you will need to enter the major labels in use at your institution. Click
the Edit button for Majors to edit these labels.
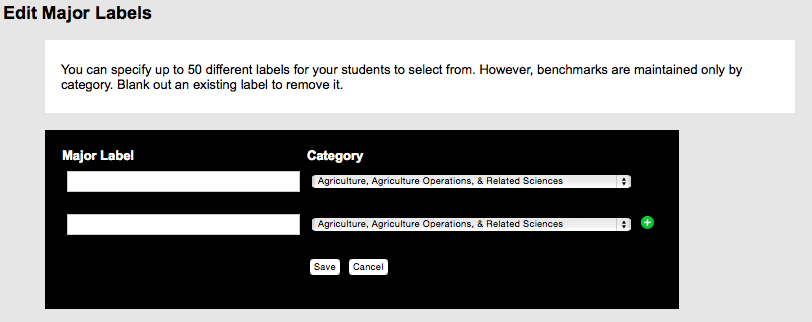
You can specify up to 50 different labels per test. Click the Add icon, , for additional
label fields. Each label must be assigned to a major category. The categories for major are:
- Agriculture, Agriculture Operations, & Related Sciences
- Architecture & Related Svcs
- Area, Ethnic, Cultural, Gender, & Group Studies
- Biological & Biomedical Sciences
- Business, Management, Marketing, & Related Support Svcs
- Communication, Journalism, & Related Programs
- Communications Technologies/Technicians & Support Svcs
- Computer & Information Sciences & Support Svcs
- Construction Trades
- Education
- Engineering
- Engineering Technologies & Engineering-Related Fields
- English Language & Literature/Letters
- Family & Consumer Sciences/Human Sciences
- Foreign Languages, Literatures, & Linguistics
- Health Professions & Related Programs
- Health-Related Knowledge & Skills
- History
- Homeland Sec, Law Enforcement, Firefighting & Rel Prot Svcs
- Legal Professions & Studies
- Leisure & Recreational Activities
- Liberal Arts & Sciences, General Studies & Humanities
- Library Science
- Mathematics & Statistics
- Mechanic & Repair Technologies/Technicians
- Military Science, Leadership & Operational Art
- Military Technologies & Applied Sciences
- Natural Resources & Conservation
- Parks, Recreation, Leisure, & Fitness Studies
- Personal & Culinary Svcs
- Philosophy & Religious Studies
- Physical Sciences
- Precision Production
- Psychology
- Public Administration & Social Service Professions
- Science Technologies/Technicians
- Social Sciences
- Theology & Religious Vocations
- Transportation & Materials Moving
- Visual & Performing Arts
- Other
- Undecided
You can assign more than one label to the same category (for example, Geology and Physics would both be assigned to the Physical Sciences category),
however, cross-institutional data are collected by category. Your report will show your scores for each major label but the cross-institutional scores will only be reported by
category. For additional information, see the Major Categories page.
English-Language Proficiency
You also have the option of asking about your students' English-language proficiency. If you include this, your students will be asked
Please rate your level of English-language proficiency. The options they can choose from are:
- I am proficient
- I am somewhat proficient
- I am not proficient
- I do not know
Click the Enable button on the right-hand side to include this question.
Custom Demographic Questions
You may want to add your own demographic questions that your students are required to answer. You can specify up to ten different custom demographic questions.
These are multiple choice questions. No open-ended questions can be included. Because these are your own local questions, no cross-institutional data will be
included in your report for these questions.
Click the Edit button to the right of the specific question to edit that question and its responses.
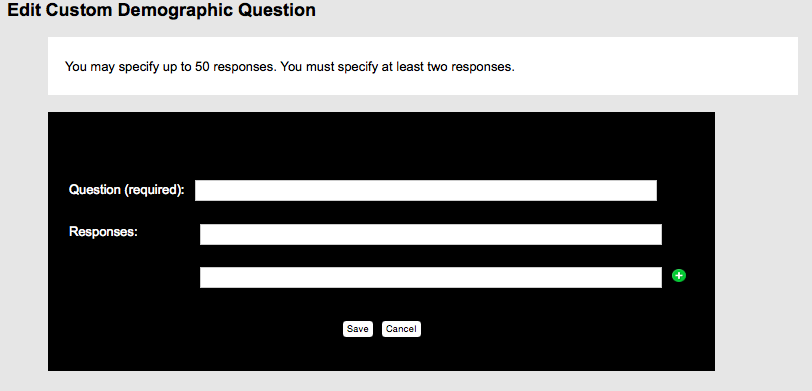
You can specify up to 50 different responses per question. Click the Add icon, , for additional
response fields. You must include at least two responses for each question you create.
At any time before you stop a test, you can view how the test will look to your students by clicking the
Preview icon, . The test will be displayed in a new browser window. You will not
need to log in to the test, as your students will, because this is just a preview and any information you enter will not be saved. You will be presented with
any informed consent text you provided, the informed consent question if you enabled it, and any standard or custom
demographic questions you set up. If you complete the test, you can also verify that your Return URL web page is
working properly. Previewing the test is a great way to make sure that your setup is exactly the way you want it.
It is possible to delete a test but only before any of your students have completed the test. If you decide that a test you added needs to be deleted,
click the Delete icon, . You will need to verify the action in the popup message that
is displayed. Once you have deleted a test, it cannot be restored.
When you have completed the setup for your test, you are ready to start testing. You do this by clicking the Start icon,
. A review page will be displayed for you to verify that the test is set up properly. Once
the test has been started, no further changes can be made to the setup. If everything looks good, click Start Testing at the bottom of the
review page.
In order for your students to be able to log in to the test, each student will need to have a unique Student Key. The key is used together with
the Test Key for your test to create a unique set of credentials that prevents unauthorized people from logging in to the test.
There are three options for Student Keys:
- The system will generate random six-digit numbers that you can give to your students,
- you can have your students use their institutional Student IDs, or
- you can have your students use their institutional email addresses.
You specify which option you are going to use when you set up your test. Once you have started testing, you cannot change this setting. To
create Student Keys, click the Key icon, .
The system-generated numbers are a good choice if you do not need to match the results of the test to specific students. This makes the test
anonymous. It is still possible to match the results if you maintain a list of which Student Key was given to which student. This can be done by
handing out the Student Keys on pieces of paper that the students return with their personal information or by creating a web script that collects this
information automatically. Creating a web script requires that you have web programming abilities. If you
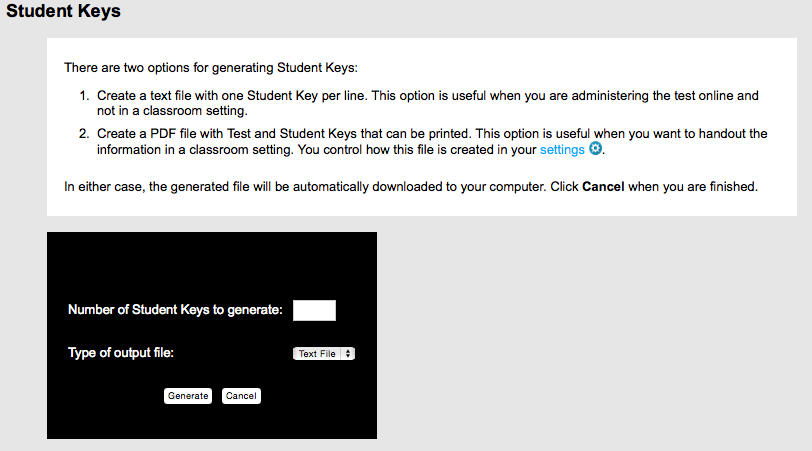
choose this option, you will be prompted for the number of Student Keys to generate and the file format to use. You can have the system create a
simple text file or produce a PDF document. If you are going to hand out the Student Keys to your students, the PDF document makes it easy to print
these out. You can control how the PDF document is created in your personal settings. The file that is created is automatically downloaded to your
computer.
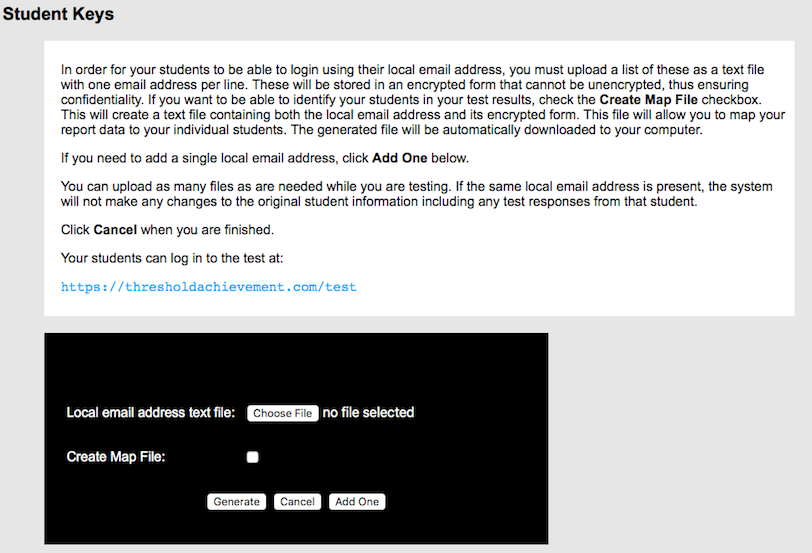
Having your students use either their institutional Student IDs or institutional email addresses may be simpler for them and easier for you.
To use this option, you will need to upload a list of the institutional Student IDs or institutional email addresses before those students
will be able to log in. The system will encrypt the identifiers to protect the identity of your students. The system will not store the original
identifiers. Be sure to only include the institutional Student IDs or email addresses in your upload file. Any other information that you include will
be encrypted along with the institutional IDs or email address. This will not work properly for your students. You can have the system send you a file
that maps the encrypted versions to your original identifiers if you want to match your test results to specific students. If you do not request this
file, there will be no way to identify your students and the test will be anonymous. If you elect to receive the map file, it will be
automatically downloaded to your computer.
The Activity icon, , allows you to view your
students' activity while you are testing. You can download a file containing the Student Keys of those students who have already completed the
test. You can also download a student report for a specific student who has completed the test (and has given consent if required).
This action is available any time after you start testing.
If your institution requires your students to consent to having their responses included in your report, you can see how many students have
consented here. The total number of students who have completed the test is displayed, followed by the number who have consented.
You are only charged for students who consent to have their responses included in your report.
The download file also contains
the start and stop date and times and the total time in seconds each student took to complete the test. You can use this list to
remove students who have completed the test before sending out reminders to those who have not. You can also use this for choosing
winners if you are offering a periodic prize incentive for students to complete the test.
Click the Stop icon, , to stop your test. Once stopped, a test cannot be restarted,
so only do this once you are certain all of your students have completed the test.
Click the Payment icon, , to arrange payment for your test.
Two payment options are available:
- Pre-pay allows you to specify the exact number of students you will test. You save $1 per student by selecting this option. This is a fixed amount and no refunds are given.
- Post-pay allows you to pay only for the students who complete the test. If you allow students to opt-out of having their responses used, you are not charged for students who opt-out.
Pre-pay can only be arranged before you start a test. Once a test has been started, post-pay is the only option available. See our Pricing page for current pricing.
Each test for which you arrange payment will be added to your shopping cart. This allows you to arrange payment for multiple tests at one time. Once you have arranged payment for all tests, click the Shopping Cart icon, , on your Manager Dashboard to generate an invoice.
Invoices can be paid by credit card or check. You can have others pay an invoice by credit card by clicking the Pay Invoice tab at the top of any page on the web site.
Click the Report icon, , to set up or download the report for your test.
Reports are generated overnight. Until your report has been generated you can continue to make changes to the report setup. Once the report has been generated, no changes to the report setup can be made.
In order for the system to be able to generate a report for your test, you will need to configure the scope and cross-institutional reporting that you want.
Only the Test Manager can configure a test report. Others at your institution that you have granted read-only access to, however, can download the completed report.
The scope of your testing refers to how comprehensive your student sample is. There are three possible scopes for you to select from:
- Select Class-level if this test was administered to students in a single course section.
- Select Program-level if this test was administered to students in multiple courses in the same program (e.g., Psychology or First Year Experience).
- Select Institution-level if this test was administered to students in multiple sections across multiple programs (e.g., a sample of seniors in capstone courses or a sample of students in courses mapped to the Information Literacy Institutional Learning Outcomes).
Your report will include cross-institutional scores for both your selected peer institution tests and for all tests belonging to your selected institution types.
When configuring your peer institutions, you must select tests from at least two different institutions. All of the tests you select will be reported as a single peer group.
You must select at least one institution type. All of the institution types your select will be reported as a single type group.
Note that if you select peer institution tests that are still running, the generation of your report will be delayed until all selected tests have been stopped. You
can return to the report setup screen and remove these tests if you need your report before these tests have been stopped.
Once this information has been submitted, your report will be created within 24 hours. You will receive an email notification when the report has been completed.
Click the Report icon again to download the completed report. Your report will come in a zip file that contains the following files:
- Test Report document. A PDF document with a complete analysis of your test results.
- Test Item document. A PDF document with a description of each test item.
- Raw data file. Contains all of the scores presented in your report.
- Student data file. Contains scores for each of your students.
- Student data codebook. Describes the demographic options that you configured for your test.
- Student Report zip file. Contains a directory of PDF documents with an analysis of each student's performance.
Reports are stored forever. You can download your report again at any time in the future.

![]() , and the Manager Dashboard title. Clicking on either of these will return
you to the Manager Dashboard from anywhere in the system. To the right of the title is the Help icon, .
Every page in the system has a help icon. Click this icon to display a popup window with help information about the page you are on.
, and the Manager Dashboard title. Clicking on either of these will return
you to the Manager Dashboard from anywhere in the system. To the right of the title is the Help icon, .
Every page in the system has a help icon. Click this icon to display a popup window with help information about the page you are on.


